Product Hub September 22, 2014
How To Standardize Your Screen Registration
One of the biggest and least understood challenges that many shops struggle with every day is how they approach the importance of screen registration. This is crucial, and can affect your overall print quality, downtime between jobs and daily throughput for your press. It’s important to remember the best way improve your registration is to establish standards, knowing that the entire lifecycle of the production process matters in the final result.
Start With Art
Screen registration is the alignment of the screen image with the original art, or ensuring each color in the separations line up correctly in relation to each other. Great screen registration starts in your art department. The relationship and communication between your art department and your screen room is crucial for ironing out the details for standardization of screens. The goal is to image and expose your screens so that each separate color for the job is placed on the screen perfectly, and will match the other colors for the job on press easily.
Start with using a standard template in your art designing software. Set up and use a different template for each location that you might print in your shop. For our example, we’re using one for the full-front placement. If this is a left-chest location, there will be a different template used. Whether your shop uses film or a computer-to-screen digital system, remember to set up the separations so they are designed the same way every time. Your screen room and art department should consult and determine the exact placement for each location for the art to be placed on the template, based on the standards for placing the image on your standard screen. Everything should be centered, but how many inches from the top could vary from each location, and that needs to be worked out based on your screen frame size and type. Make sure there is agreement among your production staff, screen room and art department on each print location’s landmark points, and set these up on your art template as registration guide layers. You can use these when placing artwork and separating your files so every order is ripped the same way.
On another layer on the template you should have registration marks, screen color name and job number so these can be exposed with the artwork for each color (Step 1). Many shops have different theories on using registration marks – some don’t use them at all as they don’t want to tape them off, while others have one in each corner. It’s really a shop preference. At a minimum, centering a set of marks with one placed above and below the image works well. Using a slightly oversized target type registration mark helps your press crew locate it quickly and find it while on press.
Importance of Screens
Your screen room is the next crucial step with the registration process. This department should follow exact standards when handling screens, and be focused and thoughtful in each step. Many shops tend to staff their screen room with a collection of misfits – as it is a very dirty, somewhat monotonous and unrewarding job – and then wonder why they have so many problems with their production and constant on-press issues. If you are in that camp, you may want to reconsider your hiring practices.
The screen room is where the mixture of craftsmanship, manufacturing and science are blended together in your shop. It is important to use tight, evenly stretched screens free of defects in the mesh. Each screen has to be thoroughly cleaned, dried and perfectly coated with emulsion. Whether you use film, vellum or a computer-to-screen imaging system, placing the image on the screen should be consistent and standardized. If you are still using film or vellum, using a jig such as a pin registration system or light table with a location chart can help line up all of the different plates so the screens will align quickly on-press. Take your time when taping the plates to the screens, and try to be careful that you place the image as straight and perpendicular to the sides of the frame as possible. Computer-to-screen systems have an advantage in that they lock in the screens and start the imaging process by locating a “home” point before starting the print process. Every screen image will line up perfectly, and never be skewed slightly like films or vellum can, as the machine print head always travels on an even axis when working.
Separations that are not placed on the screens correctly before exposure can cause registration challenges later on-press, as they will be harder to line up. Having your screen room staff emphasize craftsmanship and focus on consistent standards when imaging the screens, can go a long way in reducing your challenges with registering the screens later. Your screen room staff should also be extremely picky when choosing screens to use, as improperly stretched, warped, torn or loose mesh can cause a lot of headaches with the print crew if kept in the screen rotation. During the screen-cleaning process, your screens should be routinely checked for problems and any defective screens culled out of the daily lineup.
Registration on Press

Regardless of whether you are using a manual or automatic press, you should be able to set up a job and be ready to print in about five minutes per screen. Many veteran press operators can set up well under that time, but five minutes per screen is a good average to base your production around. There are probably as many set-up routines for registration as there are press operators. Here’s one that works really well:

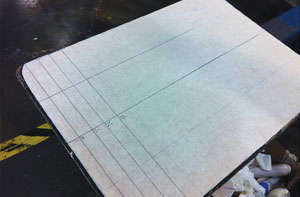
Start with establishing a “home” platen on press. This will be the platen you use to register all of the screens when printing. Use a pen and a T-square and draw a center line on platen. Next, draw a few perpendicular lines at the top of the platen (nearest you) in 1” increments. These guidelines will establish the landmarks for registering the screens (Step 2).
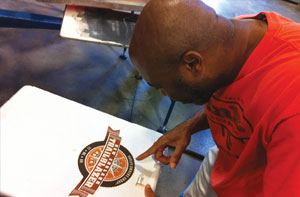
Next, place one screen in place and use the target registration marks to line the screen up with the ruled lines you drew on the platen. When you are satisfied that it lines up exactly with these marks, lock it in place. Be careful to not have the screen move when you do, or you will need to adjust.
Do the same with all other screens. Add ink, squeegees and flood bars.

Print one strike off and review. Flash cure each color as needed. Use your press micros to adjust slightly if there is any screen that needs correcting. Keep adjusting until your printed image looks perfect (Step 3). If you have multiple screens that need correction, only adjust one at a time.
Troubleshooting
Sometimes the job just won’t register, despite doing everything correctly on-press. Time is money, and there’s a tremendous pressure to quickly diagnose the problem, correct it and get that job up and running. Here are some ideas you can use to troubleshoot challenges in your shop:
- Print one screen on a junk shirt and flash cure the image. Review the registration marks and other landmark points of the problem image through the screen. What parts don’t line up? This is where you look for inconsistencies in the artwork, or to see if maybe the screen mesh is too loose or stretched unevenly.
- Review your platens on press and make sure they are centered and level with the screen. Also, look at your off contact. One unleveled platen can cause a lot of grief on press.
- The problem could be the artwork – especially if the challenge is something with the underbase plate. Sometimes the underbase white peaks out from the other colors and may look like a registration issue. Choking back on the white slightly can help remedy this; have your artist correct it and get a new screen made.
- Don’t keep it a secret. Many press operators want to keep banging away at the registration issue and will spend an eternity trying to solve the challenge. Instead, if something just isn’t working, bring in some help and have a discussion with your senior staff.
- Are your screens stretched properly? Do you routinely measure tension on your screens? Improperly stretched screens and loose mesh can cause registration challenges on press, even if the image is perfectly aligned on screen. Make sure your screen room has a quality control program that looks for problems.
- What type of training program do you have in your shop regarding registration? Does each department get the same information, vocabulary and understanding? Are you building a good foundation for success?
- There are a good number of aftermarket registration systems or devices that can help your shop minimize the downtime in setting up jobs. Check with your vendors or attend a trade show to learn what might be best suited for you.
When thinking about mitigating all the possible challenges associated with registering screens on-press, it’s important to think beyond what’s happening at the press. Look at the entire lifecycle of the screen and the workflow of getting the image created, exposed, registered and printed. Is each step standardized so it’s handled the same way every time? Think about how each staff member along the way contributes to the overall picture for registration: Does someone have an individual method of completing a task that causes problems downstream? What’s the biggest problem or concern in your shop with registration? Is your team working together and communicating ways to solve it? If not, grab a cup of coffee, sit down and start ironing out your shop’s best practices and standards for making registration an easier step in production.

Product Hub
Find the latest in quality products, must-know trends and fresh ideas for upcoming end-buyer campaigns.
