Product Hub June 23, 2014
How To Flock on Garments
One of the things I tell my clients is to go where others aren’t and you’ll be able to name your price. Working with flock is one of those things.
Flock is popular in many parts of the world. The U.S. is not one of those places. There are some companies that do use flock, especially for companies that put out a line of garments (such as Nike and Affliction), but not many, and few on the custom side. There are several reasons, but the most common one is a lack of understanding of the procedures and exactly what can be created using the technique. Another reason is the need to purchase the supplies and equipment necessary, as well as the mess that is created when not done properly in a confined area. All in all, these are not very good reasons to avoid working with it.
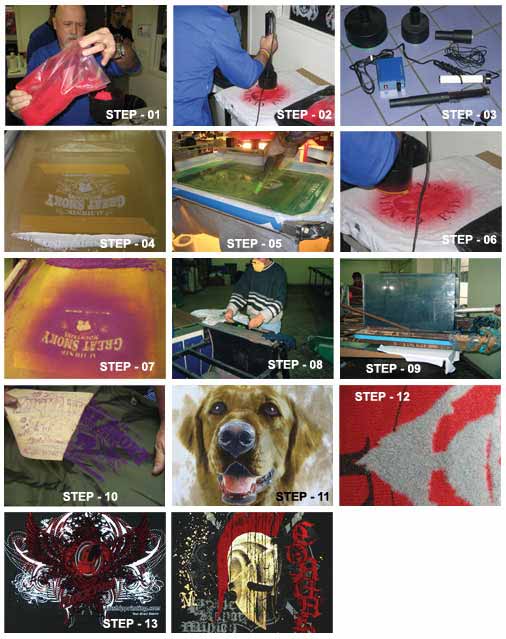
Flock is a short cut textile fiber (Step 1). It it is applied onto an adhesive on a fabric to create a print. It offers an upscale look that is incredibly unique in the marketplace. Top brands like Nike gravitate to it not only because of its look, but also because it’s very difficult for others to copy (since the majority of screen printers don’t have the proper equipment). It even offers a handy solution to common dye migration problems, such as white text on red performance fabrics.
For textile purposes, there are several types of flock that are available including polyester, rayon, cotton and nylon. (For this article, we talk about polyester and rayon.) The fiber lengths vary from .5 mm to 6 mm, but most textile applications use the .5 mm-1 mm and occasionally go up to 2 mm. The shorter fibers are recommended when first starting out because they are easier to work with and still provide a good result. It is also easier to cure the adhesive with the shorter fibers.
Let’s start with the equipment. A handheld flock gun (Step 2) costs about $1,500-$2,500, depending on the size of the canister(s) – not too bad to set yourself apart from the crowd. Heads to fit on an automatic press are another issue, but one to face only if your orders start getting to a massive level.
You will need to attach a wire from the main electrical unit to your press or a metal sheet to work with the charge that will shoot the flock from the hand-held generator into the adhesive. At the end of the hand-held generator is an applicator that holds the flock, which contains a strainer and electrode (Step 3). The hand-held generator has an on/off button and when pressed in, initiates the charge that sends the flock into the adhesive. To complete the charge, it is necessary to have metal pallets. If you don’t have a metal pallet, lay a piece of metal onto it. You can also take the garment off of the press, lay it on top of a metal sheet that has been wired and flock that way. The electrical charge is not strong and cannot hurt you.
A dryer is necessary to cure the ink. Gas-fired ones are best, but electric dryers will work.
The flock adhesive (Step 4) is very important and an area that requires a lot of attention. It has to be soft, flexible and able to hold up during a wash. Adhesives are available as plastisol types and waterbase. Since many companies are still not comfortable working with waterbase inks, we will address the plastisol type. The important thing to remember when working with the adhesive is to deposit a sufficient amount so the flock can embed itself deep enough and won’t fall out when worn or washed.
Getting the plastisol adhesive to fuse (cure) is the confusing thing. Since the flock is in and above the adhesive, it acts as an insulator. In order to cure the adhesive, the amount of heat needed is considerably higher than curing standard plastisol because it has to work its way through the flock. Plastisol inks require 275 degrees-325 degrees Farenheit through the entire ink layer to properly fuse. In order to get to those temperatures while working with flock, it will be necessary to increase the dryer temperature, slow down the dryer belt or both to allow for more time and temperature to get to the adhesive. One test to see if the adhesive is cured is to try to scratch off the flock with your fingernail once it comes out of the dryer and has cooled down.
The mesh for applying the adhesive should be very coarse so a sufficient deposit is made. I use a 60 mesh up to a 90 mesh with 71 micron threads and 200 micron capillary film for better detail.
The squeegee is also very important in order to get a sufficient amount of adhesive on the garment. A soft squeegee works best, with 60-70 durometer blades being the most common. I prefer a triple durometer 55/90/55 squeegee at a very deep angle to give me the even deposit I want.
For manual printing, flood the screen with a strong stroke to load it up with the adhesive and then print with a lot of pressure on the first stroke, followed by one to two softer strokes to achieve a high deposit (Step 5). After the adhesive has been printed, we are ready for the flock.
There are several ways to print one-color flock. The easiest, and messiest, way is to print the adhesive and then shoot the flock into it (Step 6). This is messy because the flock goes everywhere. The other method is to shoot a screen of 60 mesh of the same image as the adhesive, and shoot the flock through the screen (Step 7). The flock will only be where the adhesive is and the mess will be minimal.
For multicolor flock designs, handle the adhesive as though it were an underlay for printing on dark-colored garments, meaning it needs to be made up of the entire design that will receive the flock. The flock colors are broken down the same way you would for a multicolor design where printing with inks on top of an underlay – each color has its own screen. Make sure you have enough off contact so the flock screens come close to the adhesive but don’t touch it. Print the adhesive, do not flash, bring the first flock screen down (making sure not to touch the adhesive) and shoot the first color through the screen. Once done, bring down the next screen and shoot flock through it. Remove the garment and send it through the dryer. Once the garment comes out of the dryer, let it cool and test to see if the flock is holding.
Make sure you have a hygrometer close to where you are working on flock, since the relative humidity is a critical part of working with it. If it is too high, the flock will clump together and become lumpy. If the relative humidity is too low, it will scatter everywhere. Ideal relative humidity is about 50%-70%. If the relative humidity is too high, having a dehumidifier near the press may help. If it’s too low, have a mister near the press.
The best way to remove excess flock is with a special vacuum that has brushes on it (Step 8). The garment is held by hand and scraped over the brushes to remove the unwanted flock. Unfortunately, these vacuums cost a lot (in the $6,000 range). Another option is to use compressed air to blow off as much flock as possible into a container like a box where the flock can be reused or trashed (Step 9) and then use wide masking tape to remove the rest (Step 10).
Note that the artwork for flock should be handled very much like any other screen-printed garment, but without fine detail since the adhesive will be printed through a coarse mesh. Vector art works best – Illustrator or Corel Draw are the programs of choice. Halftones are possible, but will be a very coarse count. I use halftones in the 20 LPI range, which gives me some detail and is able to hold the flock.
Multicolor flock is fairly easy once you understand the basics (Step 11). It’s worth trying since most working with flock are only doing one-color work. Still, even one-color flock designs will stand out (Step 12). Get creative! (Step 13).

Product Hub
Find the latest in quality products, must-know trends and fresh ideas for upcoming end-buyer campaigns.